Once a new message format has been saved or during edition of existing messages, the message tree is rendered in the Visual Editor in a hierarchical and graphical form as illustrated below.
In Visual Editor, you can further configure and set up message format as well as add verification rules as explained in following sections.

Message Edit Screen
Left panel - understand tree structure
The left part of the screen shows the structure of the message, as a tree. It describes all the elements that the message format may contain.
People familiar with xml files will find many similarities between the tree definition used here and the structure of a xml file. The reason is the following: In Babelway, all message formats are first translated into xml, that is used to apply all message transformations. The structure defined here is in fact the xml representation of your message.

Structure of Message
The tree uses different types of nodes:
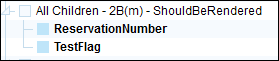
(1) A value node is just a "normal" node. It corresponds to one element in the message format that we are describing. It can just contain a value, or also be a structural element that contains other nodes. represents an element structure in the corresponding xml.
 represents an element structure in the corresponding xml which is hidden.
 represents an element in the corresponding xml. represents an element in the corresponding xml which is hidden.
 represents an element in the corresponding xml, that contains a fixed static value.
 represents an element in the corresponding xml, that contains a fixed static value which is hidden.
 represents an attribute in the corresponding xml. represents an attribute in the corresponding xml which is hidden.
 represents an attribute in the corresponding xml, that contains a fixed static value.
 represents an attribute in the corresponding xml, that contains a fixed static value which is hidden.
 represents an attribute in the corresponding xml which is hidden.
 represents an attribute in the corresponding xml, that contains a fixed static value.
 represents an attribute in the corresponding xml, that contains a fixed static value which is hidden.
A message item will be defined as an xml element or attribute depending on xml generation or translation tool that has been used. The main difference for Babelway platform is that an attribute is unique and cannot be repeated inside an element. So you cannot use loops with these attribute items.
(2) Other nodes are virtual nodes. They do not have any correspondence in the messages, but are used to tell additional information to the Babelway platform, like the fact that some elements can be repeated, or have possible structure alternatives.
-
 represents a loop node. It means that its content can be repeated multiple times.
 -
 and
and  indicate that the message can have multiple alternatives. The first icon is used to group all choices, and the second one for every option.
Note: From the message definition if you selected element structure node then hide it using the "Hide in transformations" button and its child node is mapped in the transformation, When opening this transformation after hiding it you may face the error message which says "Can not display mapping because of :" or when saving the transformation you will not be able to save it and no error message will be displayed.
Right panel - edition of element node
The right part of the screen shows how the details about the selected node. From there, you can edit all the properties of the node, or make actions on it to change the structure of the tree (delete, duplicate).
Label
Details of Selected field
General Parameters are:
- Label: The label is the text used to show this node in the message definition tree. It can be changed freely, as it has no impact on the processing of the messages.
- Description: The description allows you to save some more documentation about this node.
- Name: The name identifies the element in the xml representing the messages. Change only with care, for example XML language doesn't accept spaces.
- Default value: Only for message definition OUT. The default value will be used in the message out for this field if no mapping is done for this field.
- Filter value: Only for message definition IN. When this value is filled, only the records with this precise value will be used.
You can also add validations on nodes. The validations are assertions that will be checked when we receive a message in this format, or before we send a message in this format. If one of the validations fails, it means that the message does not comply with the definition, and the message will be put in error.
We strongly recommend that you fill the validations, and reject messages that are wrong. If you don't enforce validations, there is a big risk that you send to the receiving partner files that are not correct, because your mapping will probably not foresee all of these cases. Validations on message OUT will also allow you to detect early problems in your mappings, detecting it immediately when one of your mapping generates a message that do not comply with the definition.
The following validations are available:
- Mandatory: When a field is marked as mandatory, it must have a non-empty value. From the xml point of view, it means that the element must be present, and may not be empty.
- Type: Type of the data in the field (String, Number, Date, ...). This field will also affect the other validations that will be available.
- Length (only for Strings): Min or Max length (in characters) for the value.
- Regexp (only for Strings): Regular expression that the value must match.
- Min/max value (only for Numbers): Indicates that the number value must be between the two given limits.
- Format (only for Dates/Datetimes): Format that are accepted, like 'yyyy/MM/dd'. Full description of accepted formats can be found at Multiple allowed formats can be entered, separated by a comma.
- Custom: Custom xpath expressions that the value must match (if non-empty).
Appearance in output file is enabling you to decide the conditions in which the selected element will appear in the output file.
Here are all the possible conditions:
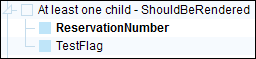
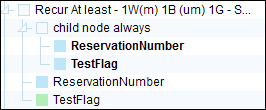
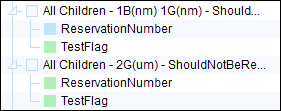
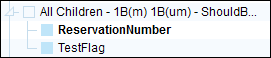
- Always: This element will always appear in the output file whether or not it's filled or not.
- If at least one non- default sub-element appears: This element will appear if at least he has a value or if one of his non-default sub-element decided to appear. By non-default, we mean an element which doesn't have a default value. In short, only structural sub-element (white) and non-default field (blue).
Example of element that will appear in the output:
One out of two blue sub-element mapped
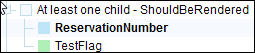
One blue and 1 green sub-element
structural sub-element appears out of 3 sub-elements.

attribute sub-element appears.
Example of element that will NOT appear in the output:

Two green sub-elements (because they are default values).If all sub-elements decided to appear in the output file
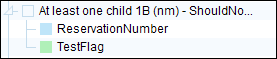
One blue with no value and one green sub-elements.
- If all sub-elements appear: If all sub-elements decided to appear in the output file
Example of element that will appear in the output:
All blue sub-elements
Example of element that will NOT appear in the output:
Two green sub-elements or One blue not filled and one green
Only one out of two blue sub-elements
Not Empty: (applies only to element without children) Will appear in the output file if it has a value.
Search

Search
To search nodes, just type part of the name that your searching.
- All the items that match will be highlighted.
- The first matching item will be selected, and details shown in right panel.
- Numbers of matching items will be displayed, with arrows to iterate between matches.
- If needed, tree will be opened, or scroll will be adjusted, so that current match is made visible.
Updating tree structure

To update the tree structure, you have different possibilities
When a node is selected, all actions that apply to this node are available on the bottom of the right panel. You just have to click on it to call the wanted action.
Move operations can be done immediately in the tree, by just drag-and-dropping your node to the new selected validation. Duplication can be done the same way, by pressing the Ctrl key before the drag.
Managing Choice
You can create choice to manage conditional processing of your message definition.
To identify a node or a set of nodes that can have several alternatives in its structure and/or value, you need to enclose the set of related alternatives within a Choice node and each alternative branch into an Option node.
A Choice node is a virtual node identifying alternative branches. Each alternative branch is a possible option and is represented by an Option virtual node as illustrated in the following example:

Example of a Choice
There are two Choice nodes, one for the Code information, that accepts either a company code or the company GLN value. The other Choice node is for the name of an company.
It is mandatory that each Option of a Choice is uniquely identifiable compared to each other. They could be identified by having different structures (like the buyer's Choice example) or by having the same structure with different static values (like in the price Choice example).
Managing Loops

Loops and grouping
A message is based on three node types as defined in the Message Definition chapter.
To specify that a value or a structural node can occur more than once, you need to enclose it in a Loop. A Loop is a virtual node representing the multiplicity of a node or a set of nodes. It is defined by its minOccurs and maxOccurs properties:
- MinOccurs defines the minimum number of repetition of the node or the set of nodes that should occur. It may be 0 or any positive number.
- MaxOccurs defines the maximum number of repetition of the node or the set of nodes that should occur. It is either a positive number or the value "unbounded " (that represents an undetermined number of repeat).
CSV Sample:
By definition a CSV message is composed of a header containing some header items, followed by one or many lines containing line items. The number of line items correspond to the number of header items.

Here is the message tree for this CSV:

Message Tree
The headers and line nodes are structural nodes, while header and line items are value nodes. To specify that the line can appear more than once, there is a virtual Loop node enclosing the line node.
Grouping
A Loop can define the multiplicity of a node sequence. To identify a node sequence in a Loop, you must manually group those relevant nodes using one of the following grouping types:
- Group By: groups together all nodes that have the same value as the Grouping value.
- Group Adjacent: groups together all nodes that have the same value as the Grouping value, provided that they are also adjacent in the message sequence.
- Group Starting With: processes the nodes in the supplied sequence in turn, starting a new group whenever one of the node matches the Grouping value.
- Group Ending With: processes the nodes in the supplied sequence in turn, closing the current group whenever one of the node matches the Grouping value.
Loop parameters can be edited by left-clicking on the loop node in the message tree in the In or Out message tab during channel editing.

Loop Parameters
The grouping value is an XPath expression identifying the grouping pattern.
By left clicking on any node, you can:
Create Loop: to enclose the selected node in a new loop node.
Remove from Loop: to remove the selected node from its parent loop.
Put in next/previous Loop: if the selected node is adjacent to a loop node you can make it join that loop to create a multiplicity on a nodes sequence (in that case, specify a Grouping value ).
Regrouping a Loop
An existing loop can also be regrouped using one of the Grouping type. To do this you can use the Regroup this Loop in the loop contextual menu. This will create a new enclosing loop that requires specifying the Grouping type and the Grouping value.
Example with a DESADV message in a CSV format:
TruckId,PalletId,PacketId,Quantity,Item
 1,       1,       1,       5,Item 1
 1,       1,       1,      25,Item 2
 1,       1,       1,       1,Item 3
 1,       1,       2,       3,Item 4
 1,       1,       2,      15,Item 5
 1,       2,       1,     100,Item 6
 1,       2,       1,       2,Item 7
 1,       2,       3,      20,Item 8
 1,       2,       3,      11,Item 9
 1,       2,       3,       9,Item 10
 1,       2,       4,      72,Item 11
 2,       1,       1,      91,Item 12
 2,       2,       1,     423,Item 13
 2,       3,       1,      88,Item 14
 2,       4,       1,       3,Item 15
 3,       1,       1,      12,Item 16
 3,       1,       1,      21,Item 17
 3,       1,       1,     666,Item 18
 3,       1,       2,       3,Item 19
 3,       1,       2,      22,Item 20
 3,       1,       2,       2,Item 21
 3,       2,       1,     211,Item 22
 3,       2,       1,      64,Item 23
 4,       1,       1,      61,Item 24
 4,       1,       1,      17,Item 25
 4,       1,       2,       2,Item 26
 4,       1,       2,       9,Item 27
 4,       1,       2,      85,Item 28
 5,       1,       1,      57,Item 29

Default Message Tree
In this example, we have a loop of lines defining an item to dispatch, where each line has the truck id for where the item is stored.
We could regroup this loop of lines by TruckId so that we can loop on all trucks and then loop inside each truck on all the items in that truck.
To do that we select the Regroup this Loop action on the loop, select the Group By value for Grouping type and set it to 'field[1] ' (as this is the XPath of the TruckId element).

Regroup this loop
We now have a loop on all trucks and a sub loop on all the items in the truck.

Sub Loop
When we want to group by the loop using two fields for example (Code and Area) then we can use the concat() function, as shown below.

Using concat() function with CSV "Message In"
Note: When the "Message In" is of type CSV then we will need to use "field" value in the field of the group by and by using the [ ] characters we will filter the needed field, For example if we want the get the first and third positions fields we will use field[1] and field[3].
XML Group-by example:
When the "Message In" is of type XML then we will use the field name, In this case it will be concat(Code,Area), as shown below.

Using concat() function with XML "Message In"
We can even go further and decide to group by PalletId and PacketId, that would give us four nested loops, one for all trucks, the next one for all pallets in a truck, the next one for all packets in a pallet and the last one, for all items in a packet.

Regroup this loop of lines by TruckId, PalletId and PacketId